- Setup LEMP (Nginx, MySQL, multiple PHP) on MacOS. In the end, you’ll have a robust, clean and fast local web development environment on Mac’s M chip or Intel
- Xcode, Homebrew (required)
- Multiple PHP version (required)
- Xdebug (Optional - But highly recommend)
- Nginx & SSL (Required)
- MySQL (Optional)
- Elasticsearch (Optional - But required for Magento 2)
- Mailhog (Optional)
- DNSMASQ (Optional)
Before starting you need a few tools installed to take the stress out of the setup process You will be using the terminal a lot of coming up (I like WezTerm)
# install xcodexcode-select-install
# install homebrew/bin/bash -c "$(curl -fsSL https://raw.githubusercontent.com/Homebrew/install/master/install.sh)"Some PHP version deprecated on the default homebrew. Use tab shivammathur/php
brew tap shivammathur/php
# Install PHP Versionbrew install shivammathur/php/php@7.4brew install shivammathur/php/php@8.1brew install shivammathur/php/php@8.2
By default, all PHP version are using port 9000. We need to change the port for each PHP version to avoid conflict. Path file: {bash} $(brew --prefix)/etc/<php_version>/php-fpm.d/www.conf
user = _wwwuser = <username>
group = _wwwgroup = staff
listen = 127.0.0.1:9000listen = 127.0.0.1:9074 # ex: for php7.4
If you want to change configure php from path {bash} $(brew --prefix)/etc/<php_version>/php.ini{bash} `
# backup php.ini
cp "$(brew --prefix)/etc/php/7.4/php.ini" "$(brew --prefix)/etc/php/7.4/php.ini.bak"upload_max_file_size = 2Mupload_max_file_size = 10M
post_max_file_size = 2Mpost_max_file_size = 10MP/S: After you adjust configure PHP, You must restart php-fpm Once you are ready, starting up php-fpm for each version
brew services start php@7.4brew services start php@8.1brew services start php@8.2Check that you have a configuration correctly
sudo lsof -i -n -P|grep php-fpm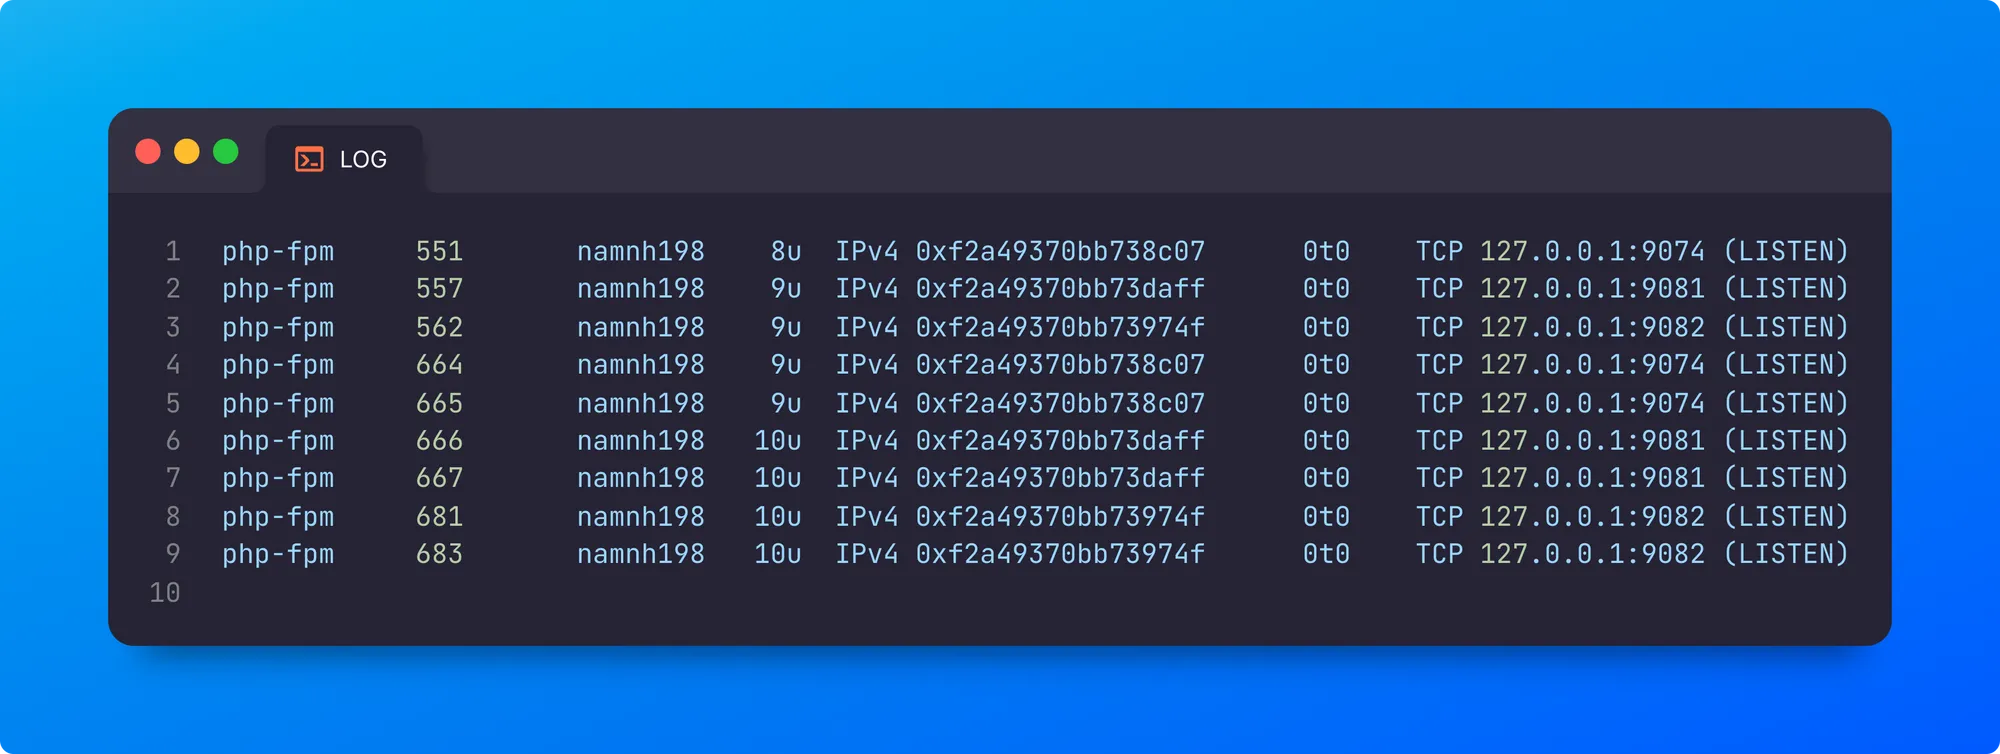
alias php74 = "$(brew --prefix)/opt/php@7.4/bin/php"alias php81 = "$(brew --prefix)/opt/php@8.1/bin/php"alias php82 = "$(brew --prefix)/opt/php@8.2/bin/php"function phpv() { brew unlink php brew link --overwrite --force "php@$1" php -v}brew link --overwrite --force php@8.2 # Switch to PHP 8.2pecl install xdebugP/s: PHP 7.4 only support xdebug <= 3.1.6. You can check it on xdebug. To install, you must install specifically xdebug version
pecl install xdebug-3.1.6Note: pecl no valiable: The root was caused by SSL certificates is invalid.. To install, we need to download & install package offline. View on StackOverflow
# Install xdebug v3.3.0curl -k -O https://pecl.php.net/get/xdebug-3.3.0.tgzpecl install --offline ./xdebug-3.3.0.tgzxdebug.mode=debugxdebug.client_port=9003 # port xdebug by default is 9003xdebug.discover_client_host = 1xdebug.start_with_request=triggerxdebug.idekey=PHPSTORM xdebug.remote_connect_back=1xdebug.max_nesting_level=-1# Install nginxbrew install nginx
# Start nginxsudo nginx
# check nginx is working (default nginx port is 8080)curl http://localhost:8080#user nobody;user <your-username> staff;# NEXT, ADD THE FOLLOWING TO THE http {} blockhttp { ... server_names_hash_bucket_size 512;}
# UPDATE INSIDE server {} blockserver { ... root <absolute_path> listen 80 default_server; # change port to 80 server_name _;}
# ADD FastCGI gateway to PHP-FPMlocation ~ \.php$ { try_files $uri =404; fastcgi_pass 127.0.0.1:9082; # use PHP 8.2 fastcgi_param SCRIPT_FILENAME $document_root$fastcgi_script_name; include fastcgi_params;}
# ADD Some Basic Security Header
add_header X-Frame-Options "SAMEORIGIN";add_header X-XSS-Protection "1; mode=block";add_header X-Content-Type-Options "nosniff";
# SET Charset UTF-8charset utf-8;
# ALLOW LARGE FILE UPLOADhttp { ... client_max_body_size 100M;}Reload nginx to apply the new config
sudo nginx -s reloadGo to http://localhost to see the result (if the port is different 80, it must be http://localhost:port) Check the PHP code can work on nginx
<?php echo phpinfo(); ?>Install mkcert
brew install mkcertbrew install nss # if you use Firefoxmkdir "$(brew --prefix)/etc/nginx/ssl"cd "$(brew --prefix)/etc/nginx/ssl"mkcert -installmkcert localhostserver { http2 on; listen 443 ssl; listen [::]:443 ssl; ssl_certificate /opt/homebrew/etc/nginx/ssl/localhost.pem; ssl_certificate_key /opt/homebrew/etc/nginx/ssl/localhost-key.pem; ssl_ciphers HIGH:!aNULL:!MD5;}Auto redirect HTTPS
server { return 301 https://$host$request_uri;}brew install mysqlbrew services start mysql
# mysql secure installationmysql_secure_installation# Default Homebrew MySQL server config[mysqld]
# Only allow connections from localhostbind-address = 127.0.0.1mysqlx-bind-address = 127.0.0.1innodb_buffer_pool_instances=8innodb_buffer_pool_size=4Ginnodb_buffer_pool_chunk_size=512Mmax_allowed_packet=1024Msort_buffer_size=256Mmax_connections=1024default_authentication_plugin=mysql_native_passwordinnodb_ft_min_token_size=2
# Add mode only if neededsql_mode = "ERROR_FOR_DIVISION_BY_ZERO,NO_ENGINE_SUBSTITUTION"
# Set Default Charsetcharacter-set-server=utf8collation-server=utf8_general_cibrew install phpmyadminlocation /phpmyadmin { alias /opt/homebrew/share/phpmyadmin; index index.php index.html index.htm; location ~ \.php$ { fastcgi_split_path_info ^(.+\.php)(/.+)$; fastcgi_read_timeout 300; fastcgi_pass 127.0.0.1:9082; fastcgi_param SCRIPT_FILENAME $request_filename; include fastcgi_params; }}Go to https://localhost/phpmyadmin Or you can use another DB GUI such as Table Plus, DBeaver, Sequel Ace
brew install mailhogbrew services start mailhog
# start withmailhog
Now, you can access MailHog at http://localhost:8025. Send a test email and check MailHog
echo "Test email from Postfix" | mail -s "Test Email" hi@example.comNext, update each php.ini file with the following, if you have multiple versions of PHP, and then restart php-fpm. Note, test@localhost should be used but will be overridden by any PHP scripts that run
sendmail_path = /opt/homebrew/opt/mailhog/bin/MailHog sendmail test@localhostFrom Magento Version ≥ 2.4, It has changed MySQL search to Elasticsearch.
brew tap elastic/tapbrew install elastic/tap/elasticsearch-fullbrew install openjdk@17Symlink OpenJDK so the system Java wrappers can find it. This information is also displayed as a Homebrew “caveat” after installing OpenJDK.
sudo ln -sfn /opt/homebrew/opt/openjdk@17/libexec/openjdk.jdk /Library/Java/JavaVirtualMachines/openjdk.jdkexport ES_JAVA_HOME=/opt/homebrew/Cellar/openjdk@17/<openjdk-version>/libexec/openjdk.jdk/Contents/Home<key>EnvironmentVariables</key><dict> <key>ES_JAVA_HOME</key> <string>/opt/homebrew/Cellar/openjdk@17/<openjdk-version>/libexec/openjdk.jdk/Contents/Home</string></dict>Run & Test Elasticsearch
elasticsearch # option -d to run detach
curl -s http://localhost:9200
Troubleshooting
unable to install elasitcsearch: Change “plist_options :manual => “elasticsearch” to “@plist_manual = “elasticsearch” on /opt/homebrew/Library/Taps/elastic/homebrew-tap/Formula/elasticsearch-full.rb:68elasticsearch fails to start: add**xpack.ml.enabled: false**to/opt/homebrew/etc/elasticsearch/elasticsearch.yml
To save yourself the fuss of editing your hosts file constantly you can use dnsmasq
brew install dnsmasq
echo 'address=/.test/127.0.0.1' > /opt/homebrew/etc/dnsmasq.conf  # add domain *.test to dnsmasqsudo mkdir -v /etc/resolversudo bash -c 'echo "nameserver 127.0.0.1" > /etc/resolver/test'
Start or restart “dnsmasq” (Need to sudo)
sudo brew services start dnsmasqConfirm “dnsmasq” is working with a ping TLDs, one at a time
ping -c 1 test.test